Create Product with upload multiple images in Angular 6 / Angular 7
Posted at: February 19, 2019 4:24 PM
How to upload multiple images or files in Angular 6 / Angular 7
In this lesson you can learn how to upload multiple images or upload multiple files in Angular 6 or Angular 7.
I have taken an example of creating a product with multiple images. And web api created in PHP (CodeIgniter) and use MySQL database.
app.module.ts
import ReactiveFormsModule and HttpClientModule into app.module.ts for create reactive form and http client.
ProductService
Create a product service and connent this service to web api.
Create methods uploadImage(), deleteImage() and saveProduct() for respective upload image, delete images and save product on the server. In this service we have used ajax for upload image. I have imported ajax from rxjs/ajax
src/app/product.service.ts
ProductComponent
Create a product component.
Import Renderer2, ElementRef, ViewChild, EventEmitter and Output into src/app/product/product.component.ts
Renderer2: It is used for UI custom rendering manipulation. You can use custom rendering to render to something other than DOM. We have used Renderer2 in this lesson for creating element and then appended in existing element.
ElementRef: We can access directly the DOM element by using ElementRef. We have accessed image as element reference for showing uploaded images.
ViewChild: The @ViewChild decorator makes it easy to access a child component from the template, a directive or even a DOM element directly. We have used for access image element directly.
EventEmitter: It is a custom handler for emitted events. We have used for after product added then remove product component from DOM.
Output: The child's EventEmitter property is an output property. Parent component listens for child component event.
Import FormBuilder and FormGroup for creating form. And also import ProductService and Product class for typed data.
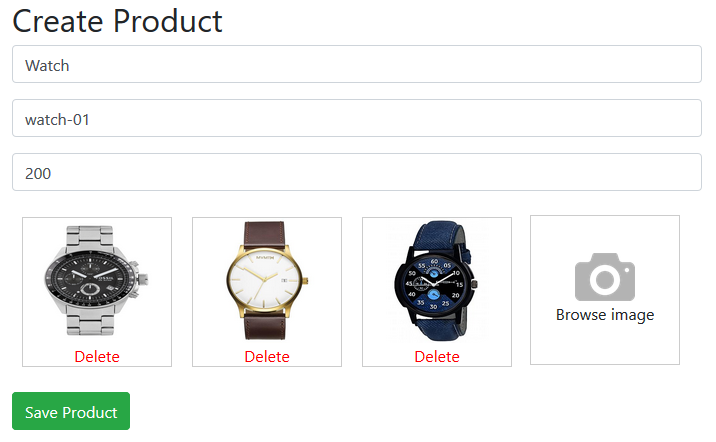
Create a method onSelectedFile() for browsing images and upload image in tmp folder on server and also show uploaded image.
Create a method deleteProductImage() you want to delete specific uploaded image before form submit.
Create a method onSubmit() for submitting the form and save the data on server.
Create a method onClose() when form submitted then the product component remove from DOM.
src/app/product/product.component.ts
src/app/product/product.component.html
src/app/product/product.component.css
src/app/app.component.ts
Using app component creates a button "Create Product". After clicking on this button, then load ProductComponent in the DOM and after submitting the form then listen child ProductComponent event (close) for removing ProductComponent from DOM.
src/app/app.component.html
Web API
Web api created in PHP (CodeIgniter 3.x)
application/controllers/Api.php
application/models/Api_model.php
MySQL Tables
Output
Conclusion
In this lesson you have learned how to upload multiple images to create a product and delete the image before submit the form. And also you have learned that how to use Renderer2, ViewChild, ElementRef, EventEmitter and Output Property.
This lesson also available on YouTube
Please leave comments
2 Comments